I received my the new Princess cartridges out for the Cricut, Dreams Come True and Happily Ever After. My youngest daughter and I put together Ariel last night together cutting her at 5 1/2" because the cartridge said some images only cut on the Expression because of their detail (I don't have an Expression!!!) The hardest part was finding the right green/blues and flesh tones. In the end all that mattered was that I spent some quality time with my kid making her favorite princess. She didn't notice that the colors weren't exactly right...of course she wanted to make Ariel's skin blue...she is still a pre-schooler after all and not locked up with my hang ups on getting it perfect.
Friday, September 28, 2007
Thursday, September 27, 2007
What color of crayon are you?
I took a test to see what color of crayon I represent...at first I came out red...but I didn't like the description...so I answered it again...it came out purple...not sure I like this one either. Oh, well, blue is my favorite color...wonder what type of person a blue crayon is?
You Are a Purple Crayon |
Your world is colored in dreamy, divine, and classy colors. You hold yourself to a sky high standard, and you are always graceful. People envy, idolize, and copy you without realizing it. You are an icon for those who know you. And while it is hard to be a perfectionist, rest assured it's paying off! Your color wheel opposite is yellow. While yellow people may be wise, they lack the manners and class needed to impress you. |
Tuesday, September 25, 2007
Christmas Card Swap
I finally got my cards made for the Christmas Card Swap I am hosting at work. I made 8 of these in about 1 1/2 hours. Mostly I kept coloring out of the lines...even my 1st grader knows how to color in the lines :)
Paper: Stampin' Up Real Red and Whisper WhiteCardstock, Stampin' Up Designer Series Dashing Pattern Paper
Ink: Basic Black, Wild Wasabi ink pad - Glorious Green and Real Read Pens
Embellishments : Dazzling Diamonds
Stamp Set: Stampin' Up's Big on Christmas (Fall/Winter 2007 Catalog)
Friday, September 14, 2007
Swaps Galore
I am now moving on to the swaps I have to have done by Oct 6th. I joined a swap at the local scrapbooking store and decided to swap baby girl cards. Now, knowing me...I never created cards when I had my girls so I guess I need to learn how to do that now. I was 7th on the list to sign up, but sign up goes until Sept 22 so there is still time to add a lot more. So right now I am just trying to design it so I can buy the supplies.
The second swap is a Christmas Card Swap. I am driving this one. We had 7 women sign up with a due date of Oct 2. I placed an order with Stampin' Up for supplies for this one. I also have several ideas for it. Can't wait to get my package and get going.
Switching offices at work...it is hard to believe that I have been in the same office for 10 years and I am just now getting booted to a new one...and it is not an improvement. I at least can see outside here if I duck into a conference room...not so with my new office. So danky and dull...just like my career there. We can't all be happy, but at least I try!
Let move away from thinking about work and get back to dreaming about fun stuff. So off to dream about baby girl cards.
Thursday, September 13, 2007
Here is the card I worked on last night. It is a 3x3 card using only Stampin' Up paper and stamps. I know I used Wild Wasabi but not to sure on the lavendar name. Used the Three for you punch set with Rhinestone brads. This is my September MailArt Card. I love this card but had a hard time making it with it being so small...my chubby fingers had to get used to it :)
Wednesday, September 12, 2007
Too much quiet around here
But let me say my household is not quiet! I went to Louisville Stampin' Up Regionals on Friday and came home with over 50 cards I swapped and around 25 3D items. I traded one designed card and 3D purses. My magnets didn't go over quite as well as I hoped, but then again I have so many uses for them they won't go to waste. Working on my MailArt card tonight with the 3 For You Punch kit. Hope to post pictures tomorrow. Have a good evening!
Thursday, September 6, 2007
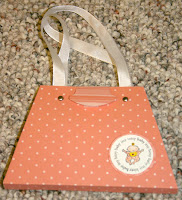
Mini Purse Album's - Pictures!
I finally got around to finishing some of those purse mini-albums and wanted to post the picture along with the instructions I used. Sorry, I don't have pictures of the process so I will try to be very clear on my instructions.
Supplies:
Supplies:
- 1 strip 7 1/4" x 5" double-sided paper
- 2 strips of 12" x 3" double-sided paper
- 2 - 8" lengths of ribbon (for handles)
- 4 - brads
- Sticky strip or taper runner
- Rounded Tab Punch for purse closure
- Magnets, velcro or other type of closure accessory
- Using the 7 1/4" x 5 " strip, score at 3 3/8" and 3 7/8" on the 7 1/4" side.
- On the 5" sides, mark inward with pencil at the 7/8" mark.
- Cut diagnonal from the 7/8" mark to the scored lines.
- Fold the score lines to create the purse.
- Score 12" x 3" papers at 1/2", 3 3/8", 6 1/4" and 8 1/8".
- Accordion fold the 12" x 3" paper on score marks.
- Using sticky strip or tape runner, apply to 1/2" area of 12" x 3" strips.
- Attach one 12" x 3" strip to center of 7 1/4" strip, cover the 1/2" "bottom of purse." Repeat this step for the second strip.
- Attach brads so as to appear to be the anchor for the handles.
- Glue ribbon over the backs of the brads on the inside of the purse, creating handles.
- With scraps, punch a rounded tab. Attach to top between handles using velcro, magnets, or other closure type materials.
- Embellish with stamps, stickers, pictures, journalling and more.
Subscribe to:
Posts (Atom)