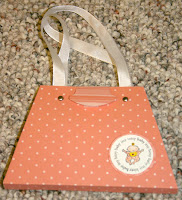
I know...I have been absent a lot lately. I had a mad rush to get ready for vacation, then I was so exhausted it is taking me a while to get back in the grove. I started by creating a card this weekend for Thanksgiving. It is my MailArt entry for November. I also started on a Christmas planner, but that might have to be for 2008 instead of 2007. Hope to get some more work out for viewing soon.
Monday, November 12, 2007
Thursday, October 4, 2007
Christmas Card Caddy
I finished up 8 Christmas Card Caddy's for the swap I am hosting at work. I used the template from Snooks and Boo.
Paper: Stampin' Up Designer Series Dashing, Stampin' Up Real Red Cardstock, Stampin' Up Whisper White Cardstock
Stamps: Stampin' Up Big On Christmas
Accessories: Card Caddy Template, Green Brads, Red Twine, dimensionals
Labels:
3D items,
Cards,
scrapbooking,
Stampin' Up,
Swap
Tuesday, October 2, 2007
I had a lot of fun creating this months MailArt Card!
Mummy Card - take white cardstock and glue a cotton ball in the place where you want the nose to appear. Next wrap, tape and glue gauze around it. It is best to start by going left to right and then criss crossing after that. Take brown ink pad and rub it across the gauze. Punch out graduated sizes of circles for the eyes, gluing them together. Glue the eyes to the gauze (tape doesn't work well here). Finally cut out mouth and glue it down. I then mounted this on black cardstock cut a little bigger than the white card stock and of course folded to make a card. Inside I wrote mummy jokes in white gel pen.
Friday, September 28, 2007
Ariel Cricut cutting
I received my the new Princess cartridges out for the Cricut, Dreams Come True and Happily Ever After. My youngest daughter and I put together Ariel last night together cutting her at 5 1/2" because the cartridge said some images only cut on the Expression because of their detail (I don't have an Expression!!!) The hardest part was finding the right green/blues and flesh tones. In the end all that mattered was that I spent some quality time with my kid making her favorite princess. She didn't notice that the colors weren't exactly right...of course she wanted to make Ariel's skin blue...she is still a pre-schooler after all and not locked up with my hang ups on getting it perfect.
Thursday, September 27, 2007
What color of crayon are you?
I took a test to see what color of crayon I represent...at first I came out red...but I didn't like the description...so I answered it again...it came out purple...not sure I like this one either. Oh, well, blue is my favorite color...wonder what type of person a blue crayon is?
You Are a Purple Crayon |
Your world is colored in dreamy, divine, and classy colors. You hold yourself to a sky high standard, and you are always graceful. People envy, idolize, and copy you without realizing it. You are an icon for those who know you. And while it is hard to be a perfectionist, rest assured it's paying off! Your color wheel opposite is yellow. While yellow people may be wise, they lack the manners and class needed to impress you. |
Tuesday, September 25, 2007
Christmas Card Swap
I finally got my cards made for the Christmas Card Swap I am hosting at work. I made 8 of these in about 1 1/2 hours. Mostly I kept coloring out of the lines...even my 1st grader knows how to color in the lines :)
Paper: Stampin' Up Real Red and Whisper WhiteCardstock, Stampin' Up Designer Series Dashing Pattern Paper
Ink: Basic Black, Wild Wasabi ink pad - Glorious Green and Real Read Pens
Embellishments : Dazzling Diamonds
Stamp Set: Stampin' Up's Big on Christmas (Fall/Winter 2007 Catalog)
Friday, September 14, 2007
Swaps Galore
I am now moving on to the swaps I have to have done by Oct 6th. I joined a swap at the local scrapbooking store and decided to swap baby girl cards. Now, knowing me...I never created cards when I had my girls so I guess I need to learn how to do that now. I was 7th on the list to sign up, but sign up goes until Sept 22 so there is still time to add a lot more. So right now I am just trying to design it so I can buy the supplies.
The second swap is a Christmas Card Swap. I am driving this one. We had 7 women sign up with a due date of Oct 2. I placed an order with Stampin' Up for supplies for this one. I also have several ideas for it. Can't wait to get my package and get going.
Switching offices at work...it is hard to believe that I have been in the same office for 10 years and I am just now getting booted to a new one...and it is not an improvement. I at least can see outside here if I duck into a conference room...not so with my new office. So danky and dull...just like my career there. We can't all be happy, but at least I try!
Let move away from thinking about work and get back to dreaming about fun stuff. So off to dream about baby girl cards.
Thursday, September 13, 2007
Here is the card I worked on last night. It is a 3x3 card using only Stampin' Up paper and stamps. I know I used Wild Wasabi but not to sure on the lavendar name. Used the Three for you punch set with Rhinestone brads. This is my September MailArt Card. I love this card but had a hard time making it with it being so small...my chubby fingers had to get used to it :)
Wednesday, September 12, 2007
Too much quiet around here
But let me say my household is not quiet! I went to Louisville Stampin' Up Regionals on Friday and came home with over 50 cards I swapped and around 25 3D items. I traded one designed card and 3D purses. My magnets didn't go over quite as well as I hoped, but then again I have so many uses for them they won't go to waste. Working on my MailArt card tonight with the 3 For You Punch kit. Hope to post pictures tomorrow. Have a good evening!
Thursday, September 6, 2007
Mini Purse Album's - Pictures!
I finally got around to finishing some of those purse mini-albums and wanted to post the picture along with the instructions I used. Sorry, I don't have pictures of the process so I will try to be very clear on my instructions.
Supplies:
Supplies:
- 1 strip 7 1/4" x 5" double-sided paper
- 2 strips of 12" x 3" double-sided paper
- 2 - 8" lengths of ribbon (for handles)
- 4 - brads
- Sticky strip or taper runner
- Rounded Tab Punch for purse closure
- Magnets, velcro or other type of closure accessory
- Using the 7 1/4" x 5 " strip, score at 3 3/8" and 3 7/8" on the 7 1/4" side.
- On the 5" sides, mark inward with pencil at the 7/8" mark.
- Cut diagnonal from the 7/8" mark to the scored lines.
- Fold the score lines to create the purse.
- Score 12" x 3" papers at 1/2", 3 3/8", 6 1/4" and 8 1/8".
- Accordion fold the 12" x 3" paper on score marks.
- Using sticky strip or tape runner, apply to 1/2" area of 12" x 3" strips.
- Attach one 12" x 3" strip to center of 7 1/4" strip, cover the 1/2" "bottom of purse." Repeat this step for the second strip.
- Attach brads so as to appear to be the anchor for the handles.
- Glue ribbon over the backs of the brads on the inside of the purse, creating handles.
- With scraps, punch a rounded tab. Attach to top between handles using velcro, magnets, or other closure type materials.
- Embellish with stamps, stickers, pictures, journalling and more.
Monday, August 20, 2007
I found a wonderful tutorial on the web for making purse mini-albums. Here was my first attempt at it. I did it again the next day (no pictures), but found a few simple things that make it go easier. The accordian folds work best if done before gluing them inside. Also, I need to measure the ribbon so I can make them the same size. I just eyeballed them for this one. I used My Creative Life papers to make this one and Stampin' Up for the other one. My daughter's birthday is coming up and I am thinking these would make great birthday favors!
Monday, August 13, 2007
Wow! 50 Cards
Yes, that is right. I finished all 50 cards for a card swap last night. They are stacked neatly on my spare work surface and I need to get a picture and the right sized box to store them in. I am so excited. Now all I have to do is start on my 3D item. Still looking for the right stamp set. Needs to be really small. About 3/4" to 1" in diameter. Oh, well, this is the fun part. Look for a picture of my cards soon.
Wednesday, August 8, 2007
Holiday World in the Heat
Ok, so we planned a vacation day several weeks back to take our kids to Holiday World for some fun. Never in my wildest dreams did I expect it to be so hot. Yes, it was 98 degrees with a heat index of 110. Needless to say we stayed in the water for as much as possible and applied sunscreen like it was the non-aging cream of our dreams. The kids loved the wave pool and especially the lazy river. My youngest surprised us by how she went under water. She has always hated going under water so the swimming lessons have paid off. We finally headed out aroudn 4:00...the heat and crowds were exhausting. But overall it was a very enjoyable day.
And to top it off, I came home and tied ribbon around my 50 cards. All that is left is putting a backing on them and they are done! Can't wait to post a picture of 50 complete cards!
Thursday, August 2, 2007
I have been working on some card ideas for a swap I am going to be involved in. I need 1-2 cards and a 3D item. I started playing around with cards with my stamps and this is one I came up with. I really like how easy it is to make (if my kids aren't around). I may tone down the bling to save some money, but I just love the affect. I used a hostess set for the Celebrate Life stamp and Double-lined Doodles for the flowers. Ribbon and cardstock are from the 2007 InColors. I just love them!
Saturday, July 28, 2007
Trying out purses for a possible swap
Trying to come up with ideas for a 3D object for a conference I am attending that they swap items at. This is one idea I am thinking of. Making 50 should be a breeze! All materials are Stampin' Up except for the ribbon and the die cutting. Die cutting is from my Cricut using Tags, Bags, Boxes and More. These are so fun to make. I am thinking of filling them with sweet candy. Need to break out more stamps! These would also make great party favors. My mind is reeling with all kinds of ideas!
Thursday, July 26, 2007
Ice Cream Birthday Wishes
Found some time tonight to work on a few projects! I started by making these two wonderful birthday cards. Made with the Doodlecharms cartridge, I cut the ice cream cone out on brown cardstock using my Cricut at size 5 1/2", also cut it again on a cream colored cardstock. Next I cut out the backed out version of just the ice cream on pattern paper. I chalked the brown ice cream cone with white chalk to draw out the cuts and then glued down the patterned paper onto it. Next, I inked the edges of the cream colored ice cream cone and stamped a birthday message in the middle. The last touch was to gather the two pieces together and punch a small hole where the cherry would go and put through a Bazill wingz large brad. This allows the card to swing open to the side like on a hinge. I love this one!
Thursday, July 19, 2007
Finally some time to scrap
Subscribe to:
Posts (Atom)